Brushing teeth with braces is one of the most important — and often underestimated — habits during orthodontic treatment. Brackets and wires create dozens of hidden spots where food and plaque quietly accumulate throughout the day, far beyond the reach of a conventional toothbrush. Fortunately, with the right technique and a few simple tools, you can keep your mouth clean, protect your gums, and make sure your treatment delivers the results you are working toward.
Why Regular Brushing Falls Short
Fixed braces change the landscape of your mouth. Brackets and wires act like tiny shelves that collect food debris and bacteria after every meal. Even if you brush twice a day with a normal technique, you are likely missing entire surfaces around each bracket. Over time, this buildup transforms into plaque — a sticky bacterial film that, when left in place for just a few days, hardens into tartar. Tartar cannot be removed at home and requires professional cleaning to treat. That is why building a thorough, consistent routine from day one is so important. To understand how tartar develops and why brushing alone may not be enough, take a look at this detailed guide: tartar and professional cleaning.
The 3-Step Brushing Technique
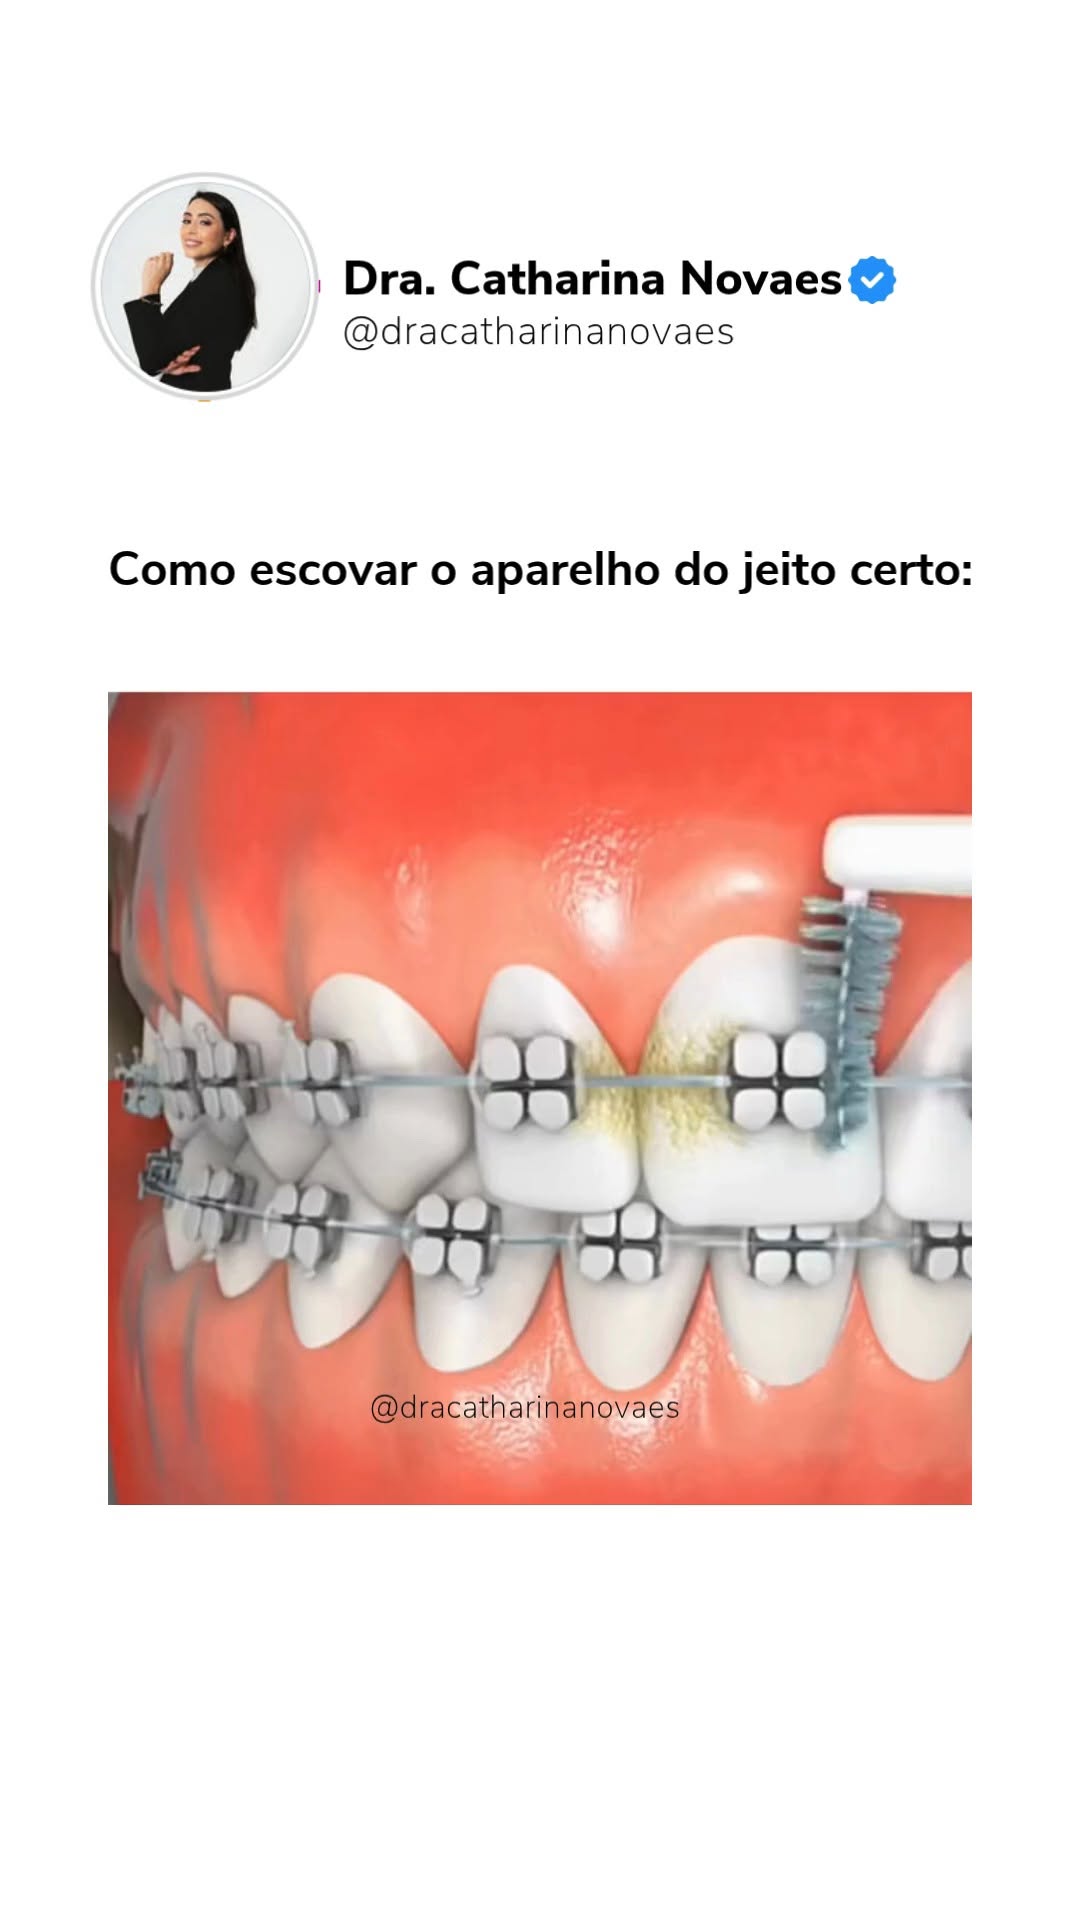
The key to effective brushing with braces is working in three separate angles so no surface goes uncleaned. This approach is consistently recommended by orthodontic professionals and supported by clinical evidence, including a systematic review with 23 clinical studies that confirmed a significant reduction in plaque with correct manual brushing. Here is how it works:
Step 1 — Above the brackets: Tilt your brush at a 45-degree angle toward the gum line and brush the upper part of each bracket with gentle back-and-forth strokes. This area accumulates plaque faster than any other zone.
Step 2 — Directly on the brackets: Position the brush flat against the front of the braces and use short, gentle strokes across the face of each bracket. Many people skip this step entirely, which leaves a significant amount of bacteria behind.
Step 3 — Below the brackets: Angle the brush downward at 45 degrees and work along the lower edge of each bracket toward the gum tissue. This final pass clears the gap between the hardware and your gum line.
After finishing all three angles on one section, move to the next group of teeth and repeat. The entire process takes only a few extra minutes — and those minutes matter.
Essential Tools That Complete the Job
Brushing with the three-angle technique removes a great deal of plaque, but two additional tools are necessary to cover every surface:
Interdental brush (proxabrush): This small, cone-shaped brush is designed to fit into the narrow space between the bracket and the wire. Insert it gently at a 45-degree angle and move it in and out with light pressure. Avoid forcing it against the wire — the goal is to dislodge debris, not to put stress on the brackets.
Orthodontic floss or Super Floss: Regular floss cannot pass under the archwire without a helper tool. A floss threader acts like a large needle that guides the floss underneath the wire, allowing you to clean between each pair of teeth. Super Floss is another convenient option — it combines a stiff tip for threading, a spongy section for cleaning around brackets, and a standard floss segment for the contact points. Using one of these methods at least once a day significantly reduces your risk of cavities and gum disease.
As an added layer of protection, a fluoride mouthwash helps remineralize areas that are slightly more exposed because of the hardware on your teeth.
What Poor Hygiene Can Cost You
Neglecting oral hygiene during orthodontic treatment can lead to consequences that outlast the braces themselves. The most visible risk is white spot lesions — permanent chalky marks on the enamel that become apparent when the braces come off. These develop because bacterial plaque produces acid that slowly dissolves the mineral surface of the tooth, and this damage is irreversible. Beyond white spots, inflamed gums (gingivitis) make it even harder to clean effectively, creating a cycle that is difficult to break. Plaque that is not removed hardens into tartar within just a few days, and only a dentist can take it off. All of these problems can compromise not only your comfort during treatment, but also the final appearance of your smile.
For a broader look at how a structured daily routine supports your treatment outcomes, read the 3-step gold rule for oral hygiene.
Your Daily Braces Hygiene Checklist
- Brush after every meal using the 3-angle technique (above, on, and below the brackets)
- Use an interdental brush to reach around the wire at least twice a day
- Floss once a day with Super Floss or a floss threader
- Rinse with a fluoride mouthwash for added protection
- Attend regular appointments for professional cleanings
Consistency matters far more than intensity. A careful two-minute session with the right technique will always outperform a hurried five-minute routine that misses the right spots.
Take the Next Step Toward a Healthier Smile
A great result at the end of treatment depends on the care you put in every single day. If you have questions about your hygiene routine, want personalized guidance, or are thinking about starting orthodontic treatment, reach out on WhatsApp — Dr. Catharina Novaes will be happy to help: Chat on WhatsApp.
Frequently asked questions
Why isn't normal brushing enough when you have braces?
Brackets and wires act like tiny shelves that collect food debris and bacteria after every meal, so even brushing twice a day with a normal technique likely misses entire surfaces around each bracket. Over time this buildup becomes plaque, which hardens into tartar within a few days, and tartar requires professional cleaning to remove.
What is the correct way to brush teeth with braces?
Use a three-angle technique so no surface is missed. Tilt the brush 45 degrees toward the gum line above the brackets with gentle back-and-forth strokes, then brush directly across the face of each bracket, then angle downward below the brackets toward the gum. A systematic review of 23 clinical studies confirmed a significant reduction in plaque with correct manual brushing.
What extra tools do I need to clean around braces?
Two additional tools complete the job. An interdental brush, a small cone-shaped brush, fits into the narrow space between bracket and wire; insert it gently at 45 degrees. Orthodontic floss or Super Floss lets you clean between teeth, since regular floss cannot pass under the archwire without a floss threader to guide it.
How often should I brush with braces?
Aim to brush ideally after every meal, working through the three angles around each bracket before moving to the next group of teeth. The entire process takes only a few extra minutes, and those minutes matter for protecting your gums and teeth and making sure treatment delivers the results you are working toward.